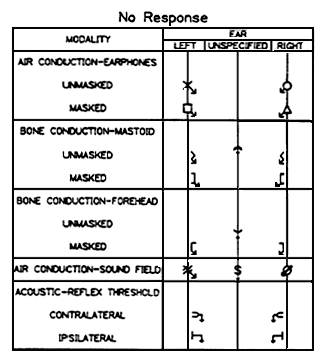
Audiometric Symbols
Guidelines
Committee on Audiologic Evaluation
About this Document
The revised Guidelines for Audiometric Symbols were prepared by the American Speech-Language-Hearing Association (ASHA) Committee on Audiologic Evaluation, and adopted by the ASHA Legislative Council (LC 19-89) in November 1989. Current and past members of the committee responsible for the development of the guidelines include Sandra Gordon-Salant, chair, 1986-1989; Martin Robinette, chair, 1984-1986; Carmen Brewer; Margaret F. Carlin; Thomas A. Frank; Thomas Folkes; Gregg D. Givens; Michael P. Gorga; Sharon A. Lesner; Robert H. Margolis; John D. Durrant; Laura A. Wilber; Carol Kamara, former ex officio; and Evelyn Cherow, current ex officio. The monitoring vice presidents included Gilbert R. Herer, past president and former vice president for clinical affairs, and Teris K. Schery, current vice president for clinical affairs.
Introduction
These guidelines were developed by the Committee on Audiologic Evaluation under the direction of the Vice President for Clinical Affairs of the American Speech-Language-Hearing Association. These guidelines present a recommended set of symbols based on listing clinical practice. The spirit of these guidelines is not to mandate a single way of accomplishing the clinical process; rather, the intent is to suggest standard procedures that, in the final analysis, may benefit the clients we serve. The intention is to allow for efficient and uniform transfer of information. Much of what appears in this document was taken from ASHA's previous guidelines covering the same topic (ASHA, 1974). In addition, the opinions of practicing clinicians were sought and many of their suggestions are incorporated into this revision of the Guidelines for Audiometric Symbols.
Audiometric symbols used to record the results of conventional pure tone threshold audiometry were suggested by ASHA ( 1974), following a review by the Committee on Audiologic Evaluation. Jerger ( 1976) has described further options in the way audiometric data might be reported in scholarly publications. Many audiometric symbols are used universally, while others are unique to particular facilities and clinics. Such a situation could cause misinterpretation when data in graphic form are shared among clinics. This is of particular concern because graphic representation is probably the most common form for reporting pure tone, audiometric results.
The purpose of these guidelines is to set forth a set of symbols and procedures for use in the graphic representation of audiometric findings for frequency specific stimuli. There are clinical situations in which graphic depictions are not ideal, such as serial hearing tests in an industrial setting or in the schools; however, the recommendations to follow should be appropriate to other clinical situations where graphic representations are used.
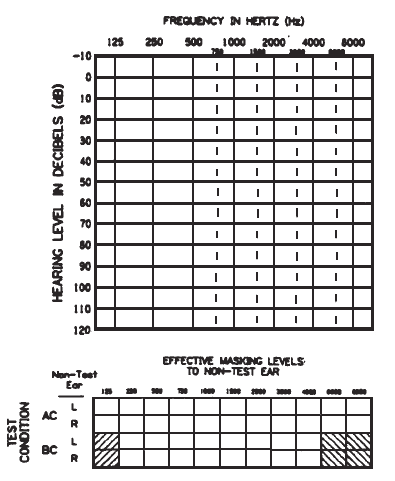
The Audiogram
As recommended in the ANSI S3.21-1978 (R.I 986) "Methods for Manual Pure-Tone Threshold Audiometry, the audiogram shall be shown as a grid with frequency, in Hertz (Hz), represented logarithmically on the abscissa and hearing level (HL), in decibels (dB), represented nearly on the ordinate. One octave on the frequency scale shall be equivalent in span to 20 dB on the HL scale. The abscissa shall be labeled "Frequency in Hertz (Hz)" and the ordinate shall be labeled Hearing Level in Decibels (dB)." Different standards currently exist for reference equivalent threshold levels for air conduction and bone conduction (these references may be consolidated in a future standard), and there are many reference levels that are used for data plotted on an audiogram but for which no standard fists (e.g., thresholds obtained with insert earphones or to high frequency stimuli, sound field thresholds). Because of this diversity in how audiograms are used, it is recommended that the reference used to establish 0 dB HL should be listed on the audiogram form, although not necessarily as part of the label on the ordinate. The 0 dB threshold level should be shown prominently so that it stands out from other HL grid lines. The range on the abscissa should include frequencies from 125 Hz to 8000 Hz while the range on the ordinate should include levels from -10dB to 120 dB HL Wider ranges of level may be used (e.g., -20 to 130 dB HL), because many audiometers are capable of producing these levels and there may be clinical situations when the audiologist chooses to test levels below -10dB HL or above 120 dB HL Similarly, there are instances when frequencies above 8000 Hz may be tested. If one chooses to record thresholds for frequencies above 8000 Hz on the audiogram, a logarithmic frequency scale should be used, such that the interval between 8000 Hz and 16000 Hz is accurately represented as an octave interval, equal in spacing to all other octave intervals on the form. Clinicians attempting to assess hearing sensitivity for frequencies above 8000 Hz are referred to the literature that underscores some of the special calibration difficulties that are encountered when using these high frequencies (e.g., Stelmachowicz, Beauchaine, Kalberer, Larger, & Jesteadt, 1988; Stelmachowicz, Gorga, & Cullen, 1982; Stevens, Berkovitz, Kidd, & Green, 1987; Stinson & Shaw, 1982).
Grid lines of equal darkness and thickness are recommended at octave frequency intervals and at 10dB HL intervals. If grid lines are used for interactive frequencies, then they should be finer or dashed in order to distinguish them from these for octave frequencies. It should be recognized that while 750,1500,3000, and 6000 Hz; are often represented and used as geometrically centered interactive frequencies, these representations are technically Incorrect. The errors are small and probably not of clinical significance; however, clinicians should be aware that the arithmetic average between octave frequencies does not represent the true semioctave frequency. The dashed lines for 750,1500, 3000, and 6000 Hz in all of the audiograms in this document are drawn at the appropriate place on a logarithmic scale; they are not centered between the lines representing octave frequencies.
An example of an audiogram form is illustrated in Figure 1. Specific recommendations on the type and amount of additional information to be included on the audiogram, such as patient and tester identification, and results of other tests, are not included in these guidelines since they may be more appropriately specified by individual clinics. In addition, some clinics may choose to represent each ear on a separate audiogram while others may prefer to report audiometric data for both ears on the same graph. Such decisions also are considered a matter of preference and are left to the discretion of individual clinics.
Figure 1. An example of the audiogram form, showing appropriate dimensions. Note that 20 dB on the ordinate equals one octaveo n the abacissa.
The Audiometric Symbols
The audiometric symbols are shown in Table 1 and were selected using the following criteria:
-
Simple in design, easily drawn, and sharply reproducible by xerography or other reproduction methods;
-
Mutually exclusive from and internally consistent with other symbols in the system;
-
Capable of delineating, without recourse to color coding [1] , the following distinctions:
-
left ear from right ear,
-
air conduction from bone conduction,
-
masked from masked conditions,
-
response from no response, and
-
the transducer (earphone [2] , vibrator, loud speaker) used to present the stimuli; and
-
-
Designed to permit multiple notation at a single level on the audiogram.
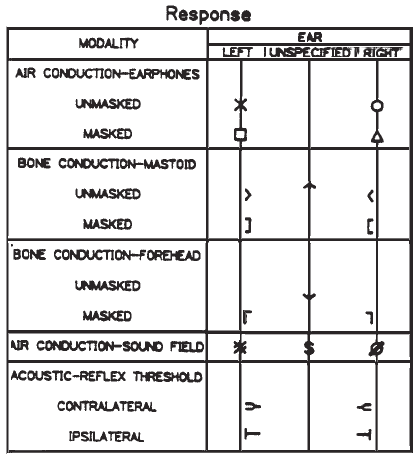
The symbols recommended in this guideline were taken directly from those specified in appropriate standards (ANSI S23.21-1978, R-1986; ANSI S3.39-1987), with two exceptions. The rationale for recommending these two exceptions will be given when their use is discussed in this guideline.
Further Specifications
Symbols typically represent the transducer placement and not necessarily the ear from which the response is coming. This general point should be kept in mind, especially when considering the choices of symbols for unmasked bone conduction, which are described below.
Air Conduction Symbols
The air conduction threshold symbols should be drawn on the audiogram so that the midpoint of the symbol centers on the intersection of the vertical and horizontal axes at the appropriate frequency and hearing level (for example, see Figures 2, 3, 4, and 6). These symbols should be reserved for those conditions when stimuli are presented under earphones as opposed to in the sound field (i.e., using a loudspeaker as the transducer).
Figure 2. The use of symbols for unmasked, unoccluded bone conduction thresholds, and masked right air conduction thresholds and masked right bone conduction thresholds using mastoid placement. Note that the unmasked left bone conduction symbol is placed to the right of the verticl frequency line with the open end pointing towards the left. The masked right ear bone conduction thresholds are plotted as open brackets, with the open ends pointing toward the right. Also, note that, to avoid clutter, only the masked air conduction thresholds are plotted for the right ear. Finally, contralateral acoustic reflex thresholds are represented.
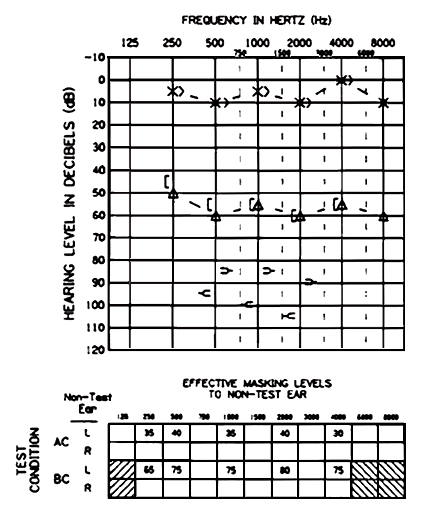
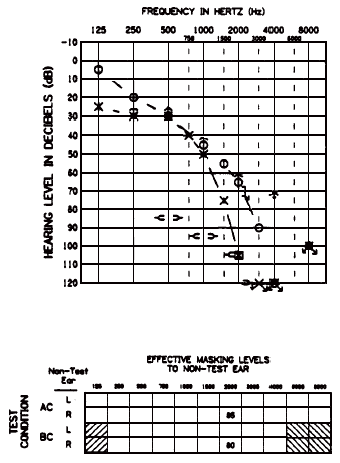
Figure 3. The use of symbols for unmasked, unoccluded, bone conduction thresholds in a case of symmetrical hearing loss without an air-bone gap. Ipsilateral acoustic reflex thresholds also are shown.
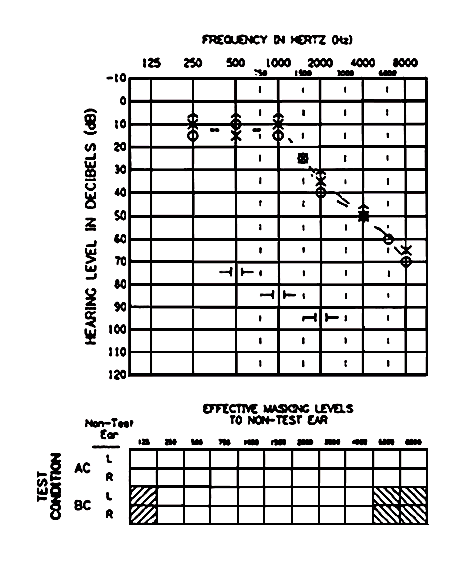
Figure 4. The use of unmasked bone conduction symbols for the left and right ears (mastoid placement), and unmasked and masked air conduction symbols for the left ear. Note the orientation of the masked bone conduction symbols.
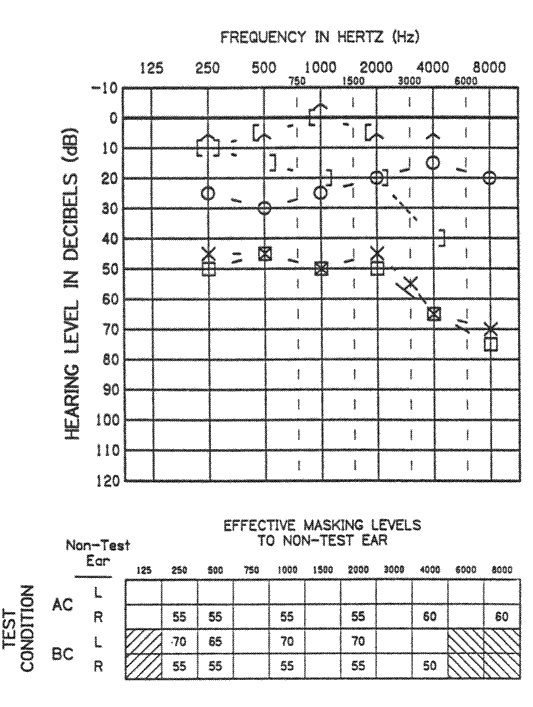
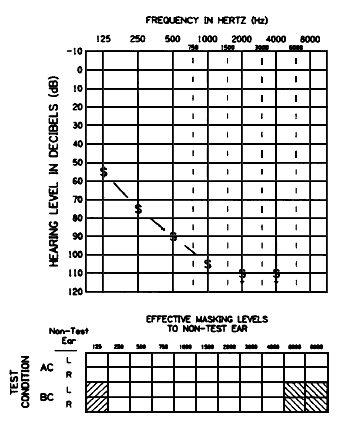
Figure 6. Air and bone conduction symbols when thresholds are similar. Note that only the unmasked symbol was used for bone conduction at those frequencies for which the air and bone conduction thresholds were similar for the two ears. Masked, bone conduction thresholds were only measured for the left ear. Contralateral acoustic reflex thresholds also are shown. Finally note the use of no response symbols for both ears.
Bone Conduction Symbols
The specifications for 0 dB HL via bone conduction were determined while masking was presented to the nontest ear (ANSI S3.26-1981). On the other hand, unoccluded, unmasked bone conduction thresholds are measured in many clinical situations. In cases of symmetrical sensitivity for air conducted signals without conductive hearing loss, differences been masked and unmasked bone conduction thresholds should be clinically insignificant because the central masking effect is small ( Zwislocki, Buining, & Glantz, 1988).
There is disagreement as to how to represent unmasked bone conduction thresholds. Previous guidelines ( ASHA, 1974) proposed using a different symbol, depending upon whether the vibrator is placed on the left or right mastoid (see Table 1). This convention is consistent with the idea that symbols only represent transducer placement, and not the source of any measured response. There is no problem with this approach as long as these symbols are not interpreted to mean that the response is coming from the ipsilateral cochlea.
An alternative approach is to plot unmasked bone conduction thresholds in a way that does not suggest that the response is coming from either ear. This caution results from the fact that an unmasked bone conduction threshold often cannot be assigned to either cochlea, regardless of the placement site of the vibrator on the head. One suggestion to plot unmasked bone conduction thresholds as a down bracket that does not refer to either ear ( Herer, 1967) [3] . However, this symbol is comparable to the ones used for masked bone conduction thresholds. Another option is to plot unmasked bone conduction as an upside down "V" as shown in Table 1.3. This symbol is recommended because it is more consistent with the ear-specific unmasked bone conduction symbols in the system, with the exception that it is rotated 90 degrees. When symmetrical air conduction thresholds are obtained, and there are no differences between these thresholds and the unmasked bone conduction threshold (i.e., symmetrical sensorineural hearing loss), then it is sufficient to record only the air conduction thresholds and the unmasked bone conduction thresholds. An example is shown in Figure 3.
Masked bone conduction thresholds, using a mastoid placement, should be represented as a bracket, with the open side close to but not in contact with the vertical frequency line. The symbol for the left ear should be on the right side of the frequency line while the symbol for the right ear should be on the left side of these vertical lines. Examples are shown in Figures 2, 4, and 6.
Forehead placement of the vibrator may be necessary in some cases, such as patients who have had mastoid surgery. The standards for 0 dB HL at the forehead and at the mastoid are not identical (ANSI S3.26-1981), requiring the use of a different set of corrections to derive 0 dB HL. Furthermore, the maximum level that can be achieved with a forehead placement is less than what is possible at the mastoid. If forehead placement is used, unmasked thresholds should be represented as a "V" at the appropriate intersection of frequency and level. For masked thresholds, a "semi-bracket," such as those shown in Table 1, should be placed at the appropriate intersection of frequency and level, following the convention designated for masked bone conduction thresholds using a mastoid placement.
Multiple Notations
When unmasked or masked air conduction thresholds are identical at a given frequency, the left and right symbols should overlap. When masked bone conduction thresholds occur at the same HL as air conduction thresholds, the bone conduction symbols should be placed adjacent to, but not touching, the air conduction symbols. When unmasked bone conduction thresholds occur at the same HL as an air conduction threshold, the unspecified bone conduction symbol should be placed slightly above the air conduction symbol. Examples are shown in Figures 2, 3, 4, and 6. Alternatively, if one chooses to use the unmasked bone conduction symbol that reflects transducer placement, the symbol should be drawn adjacent to but not touching the air conduction symbol when these two thresholds are the same.
Acoustic Reflex Thresholds
The American National Standards Institute has approved a document that specifies the characteristics of devices that are used to measure aural acoustic immittance (ANSI S3.39-1987). Included in this document are recommendations for symbols that can be used to represent ipsilateral or contralateral acoustic reflex thresholds (ART) on the audio-ram. These symbols are shown in Tables 1 and 2, and examples are given in Figures 2, 3, and 6. Implicit in plotting ARTs directly on an audiogram is the assumption that the eliciting stimulus can be calibrated in dB HL. Although the standards that are used for routine pure-tone audiometric testing would be applicable for contralateral ARTs (assuming a supra-aural earphone was used), a similar standard does not exist for ipsilateral stimulation. Wilber, Kruger, and Killion (1988) provide "provisional reference equivalent threshold levels" for insert earphones which also may be used for converting the level of ipsilateral stimuli to dB HL.
Sound Field Thresholds
Currently, no standards exist for sound field testing and calibration, although the International Standards Organization (ISO) is considering this issue and may recommend the use of an ear specific symbol if the opposite ear is plugged during testing ( L.A. Wilber, personal communication, 1988). These proposed symbols are shown for left and right ears in Table 1. The Committee on Audiologic Evaluation recommends retaining the use of the symbol, "S," to represent threshold recorded in the sound field that cannot be assigned to either ear. This symbol should be plotted at the appropriate intersection of frequency and level. If one wishes to plot sound field thresholds on an audiogram, the committee recommends the use of some correction to convert sound field sound pressures to equivalent dB HL (e.g., Morgan, Dirks, & Bower, 1979; Walker, Dillon, & Byrne, 1984). Alternatively, sound field thresholds can be measured directly in dB SPL without attempting to convert these values to equivalent dB HL. In these cases, however, the results should not be recorded on the audiogram form.
When functional gain measurements are used in hearing aid evaluations, there is the added concern that results with different hearing aids also must be represented. Data for individual aided conditions should be represented by a set of locally determined symbols that are exclusive of any other symbols and should be defined on the audiogram.
No Response
To indicate "no response" at the maximum output of the audiometer, an arrow should be attached to the lower portion of the appropriate symbol and drawn downward and at about a 45-degree angle to the right for the left ear symbols and to the left for the right ear symbols. The brow for sound field and unmasked bone conduction symbols should be attached at the bottom and drawn straight downward.
The "no response" symbol should be placed on the audiogram at the HL representing the maximum output limit for specific frequencies, transducers, and audiometers. Each of the "no response" symbols is shown in Table 2. Appropriate usage is shown in Figures 5 and 6.
Figure 5. The use of symbols for sound field thresholds. Note that the symbol is centered on the frequency line. Also note the use of the down arrow at 2000 and 4000 Hz, signifying that no response was elicited. These latter two symbols are not attached by lines to the symbols at lower frequencies where responses were observed.
When a patient has many "no responses," notation other than by symbol may be used to avoid cluttering the audiogram. Of course, another clinician may not be aware of the output limits of the audiometer used to measure thresholds. The rehabilitative impact of knowing exact audiometer limits a function of frequency may be relevant to certain clinical decisions such as cochlear implant candidacy.
Lines Connecting Symbols
Lines may be used to connect symbols on an audiogram. When used, a solid line should connect the air conduction threshold. Typically, bone conduction thresholds are not connected by lines, especially when no air-bone gap is present. In cases of an air-bone gap, a dashed line can be used to connect bone conduction thresholds. Whenever lines are used, it is recommended that the lines only approach the symbols; the lines should not touch or go through the symbols. Examples are shown in Figures 2–6.
Symbols representing "no response for either air conduction, bone conduction or sound field testing SHOULD NOT be connected by lines to each other or to any of the response symbols.
Color Coding
Color coding is not necessary to transmit information about sidedness in this symbol system. In practice, color coding becomes meaningless because this code will be lost in the copying process.
Masking
While entirely optional, effective masking levels could be recorded on the audiogram for both air conduction and bone conduction thresholds, depending upon individual preference. When this policy is followed, the maximum effective masking level used to obtain threshold at each frequency should be recorded. This level should be reported for the nontest ear, because this is the ear to which the masking stimulus is being delivered. Examples are shown In Figures 2, 4, and 6. Oftentimes, both unmasked and masked thresholds are recorded on the audiogram. This may be vied by some clinicians as excessive cluttering the audiogram (see, for example, Figure 4). In cases when masking must be used, it is acceptable to plot only the masked thresholds (see Figure 2).
Acknowledgments
Special thanks are extended to Steve Neely and Theresa Langer of the Boys Town National Institute for writing the software and generating the figures and tables that are included in these guidelines.
References
American National Standards Institute. (1978). Methods for manual pure-tone threshold audiometry (ANSI S3.21-1978, R-1986). New York: ANSI.
American National Standards Institute. (1981). Reference equivalent threshold force levels for audiometric bone vibrators (ANSI S3.26-1981). New York: ANSI.
American National Standards Institute. (1988). Specifications for instruments to measure aural acoustic impedance and admittance (Aural acoustic immittance) (ANSI S3.39-1987). New York: ANSI.
American Speech and Hearing Association. (1974). Guidelines for Audiometric Symbols. Asha, 16, 260–264.
Herer, G. R. (1967). A suggested symbol for bone conduction testing. Journal of Speech and Hearing Disorders, 32, 198.
Jerger, J. (1976). Proposed audiometric symbol system for scholarly publications. Archives of Otolaryngology, 102, 33–36.
Morgan, D. E., Dirks, D. D., & Bower, D. R. (1979). Suggested threshold sound pressure levels for frequency-modulated (warble) tones in the sound field. Journal of Speech and Hearing Disorders, 44, 37–54.
Stelmachowicz, P. G., Beauchaine, K. A., Kalberer, A., Langer, T., & Jesteadt, W. (1988). The reliability of auditory thresholds in the 8- to 20-kHz range using a prototype audiometer. Journal of the Acoustical Society of America, 83, 1528–1535.
Stelmachowicz, P. G., Gorga, M. P., & Cullen, J. K. (1982). A calibration procedure for the assessment of thresholds above 8000 Hz. Journal of Speech and Hearing Research, 25, 618–623.
Stevens, K., Berkovitz, R., Kidd, G., & Green, D. (1987). Calibration of ear canals for audiometry at high frequencies. Journal of the Acoustical Society of America, 81, 470–484.
Stinson, M. R., & Shaw, E. A. G. (1982). Wave effects and pressure distribution in the ear canal near the tympanic membrane. Journal of the Acoustical Society of America, 71(Suppl. 1), S88.
Walker, G., Dillon, H., & Byrne, D. (1984). Sound field audiometry: Recommended stimuli and procedures. Ear and Hearing, 5, 13–21.
Wilber, L. A., Kruger, B., & Killion, M. C. (1988). Reference thresholds for the ER-3A insert earphone. Journal of the Acoustical Society of America, 83, 669–676.
Zwislocki, J. J., Buining, E., & Glantz, J. (1968). Frequency distribution of central masking. Journal of the Acoustical Society of America, 43, 1267–1271.
Zwislocki, J., Kruger, B., Miller, J. D., Niemoller, A. F., Shaw, E. A., & Studebaker, G. A. (1983). Earphones in audiometry. Journal of the Acoustical Society of America, 83, 1688–1689.
Notes
[1] Color coding might still be considered if it is felt that it would further clarify results.
[2] The reader is referred to Zwislocki et al. (1988) for a more complete description of the kinds of earphones that have been used in audiometry.
[3] It should be recognized that this symbol has not been recommended for use in any published standard.
Index terms: acoustic impedance audiometry
Reference this material as: American Speech-Language-Hearing Association. (1990). Audiometric symbols [Guidelines]. Available from www.asha.org/policy.
© Copyright 1990 American Speech-Language-Hearing Association. All rights reserved.
Disclaimer: The American Speech-Language-Hearing Association disclaims any liability to any party for the accuracy, completeness, or availability of these documents, or for any damages arising out of the use of the documents and any information they contain.
doi:10.1044/policy.GL1990-00006